Test Data AC3-03: Difference between revisions
| Line 37: | Line 37: | ||
{|border="1" cell padding="20" cell spacing="3" | {|border="1" cell padding="20" cell spacing="3" width="600" align="center" | ||
! !!colspan="2"| MP | ! !!colspan="2"| [[DOAPs#MPs:_Measured_Parameters|MP]] | ||
|- | |- | ||
! || Axial Velocity || Tangential Velocity | ! || Axial Velocity || Tangential Velocity | ||
Revision as of 18:03, 2 March 2009
Cyclone separator
Application Challenge 3-03 © copyright ERCOFTAC 2004
Overview of Tests
A series of experiments were carried out on a cyclone with the geometry shown in Figure 2. A comprehensive description of the experimental approach was provided by Ayers et al. 7 and is reproduced below.
“A backscatter LDA system that consisted of a beam splitting, frequency shifting assembly, a beam collimation and output system, a backscatter collection system and a correlation and computing combination was used to measure the axial and tangential velocity in a series of radial lines within the cyclone.
The light from a 488mm argon laser was focused onto a rotating diffraction grating using a 200mm focal length lens. This ensured a circular cross section of the diffracted beams, thus maximising subsequent beam crossing and minimising uncorrelated noise. The rotating grating, whose function was to produce a frequency difference in the diffracted orders and effective translation of the probe fringe pattern was also controlled.
Two further lenses collimated the + or – 1 orders and also permitted the choice of beam separation and hence fringe spacing. The beams were focused and crossed by an output lens at 1500mm focal length thus providing some considerable distance between the test rig and instrumentation. For single photon collection, as with this configuration, data processing was by auto correlation and summation resulting in accumulated autocorrelation functions containing all velocity variations occurring during the sampling interval. Each sampling operation was controlled by a ‘PET’ microcomputer and data were analysed either by fast Fourier transformation or curve fitting by a Tektronix CP4165 processing package. The collection system, which was aligned at 15 degrees to the output axis as a means of obtaining the desired longitudinal resolution, consisted of a 750mm focal length lens of 112mm aperture focusing onto a collection pinhole which controlled the lateral resolution. A Malvern Instruments RF313 photomultiplier, which was capable of observing single photons, was focused on the collection pinhole and its output was sent to the processing system which consisted of a 50 ns burst correlator which stored cumulative autocorelation functions for each photon train.
In a typical experimental run the test rig, which was on a motor driven traverse, was scanned across the region of interest with the fringe velocity being measured for each sample point simultaneously by feeding the counting pulses from a gravity monitor to one of the correlator storage channels. An orthogonal velocity component was then observed by moving the rotating grating in such a way that diffraction was into an orthogonal plane. For the present work the fringe velocity employed was approximately 54 m/s and the fringe spacing was 52 microns. The spatial resolution, which was determined largely by the angle of collection and waist diameter of the probe volume was about 1mm longitudinally and 1mm laterally based on a 100 times drop in collected signal strength at these limits.
Seeding was carried out by means of 0.5 micron titanium dioxide particles generated by a fluidized bed.
The closest approach to the walls was 0.00924m.”
The experimental results were presented by Ayers et al. 7.
| Name | GNDPs | PDPs | MPs | ||
|---|---|---|---|---|---|
| Inlet re | Air inflow rate (m3/s) | Release density (kg/m3) | Detailed Data | DOAPs | |
| EXP 1(velocity measurements) | 0.08 | 1.225 | Axial and tangential velocity components | Axial and tangential velocity profiles | |
| MP | ||
|---|---|---|
| Axial Velocity | Tangential Velocity | |
| EXP 1 (velocity measurements) | Axial-xxcm.dat* | Tangential-xxcm.dat* |
- xx corresponds to the measuring profile
Links to the data files are as follows:
Axial: axial-32cm.dat, axial-35cm.dat, axial-38cm.dat, axial-41cm.dat, axial-59cm.dat, axial-62cm.dat, axial-66cm.dat, axial-77cm.dat, axial-80cm.dat
Tangential: tangential-32cm.dat, tangential-35cm.dat, tangential-38cm.dat, tangential-41cm.dat, tangential-59cm.dat, tangential-62cm.dat, tangential-66cm.dat, tangential-77cm.dat, tangential-80cm.dat
Table 2 EXP-B summary description of all measured parameters and available datafiles
Test Case EXP-1
Description of Experiment
Velocity measurements were recorded on radial lines located at vertical distances of 0.32, 0.35, 0.38, 0.41, 0.59, 0.62, 0.66, 0.77 and 0.8m from the top of the cyclone. These locations were identified in Figure 2. The experimental procedure was described above. The data obtained were presented by Slack et al. [8] and the resulting flow profiles are included in hard copy graphical format in this document.
Boundary Data
The inflow rate of air to the cyclone was 0.08m3/s and steady and this flow rate was calculated by integrating the measured inlet velocity profile. Turbulence at the inlet was not quantified in the experiments. This is not seen as a critical shortcoming because the turbulence structure in the cyclone is not heavily influenced by inlet turbulence. The underflow to the physical structure was blanked off at a location just below the underflow boundary and this resulted in an underflow flow component of zero.
Measurement Errors
The accuracy with which the system calculated the peak velocities was assessed using analytically generated correlation functions with different degrees of random noise superimposed. The error on peak velocities was estimated to be ±0.25m/s. [7].
Measured Data
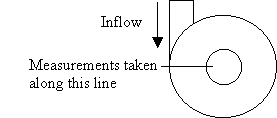
The tangential and axial velocity components were measured using the technique described above along radial lines at the measurement locations identified in Figure 2. On plan the position of the measurement locations is shown in Figure 3. The data are presented in graphical hard copy format within this document. An electronic copy of the data is also available.
Figure 3 Plan position of radial measurement locations
© copyright ERCOFTAC 2004
Contributors: Chris Carey - Fluent Europe Ltd
Site Design and Implementation: Atkins and UniS
Top Next

